
Editor#
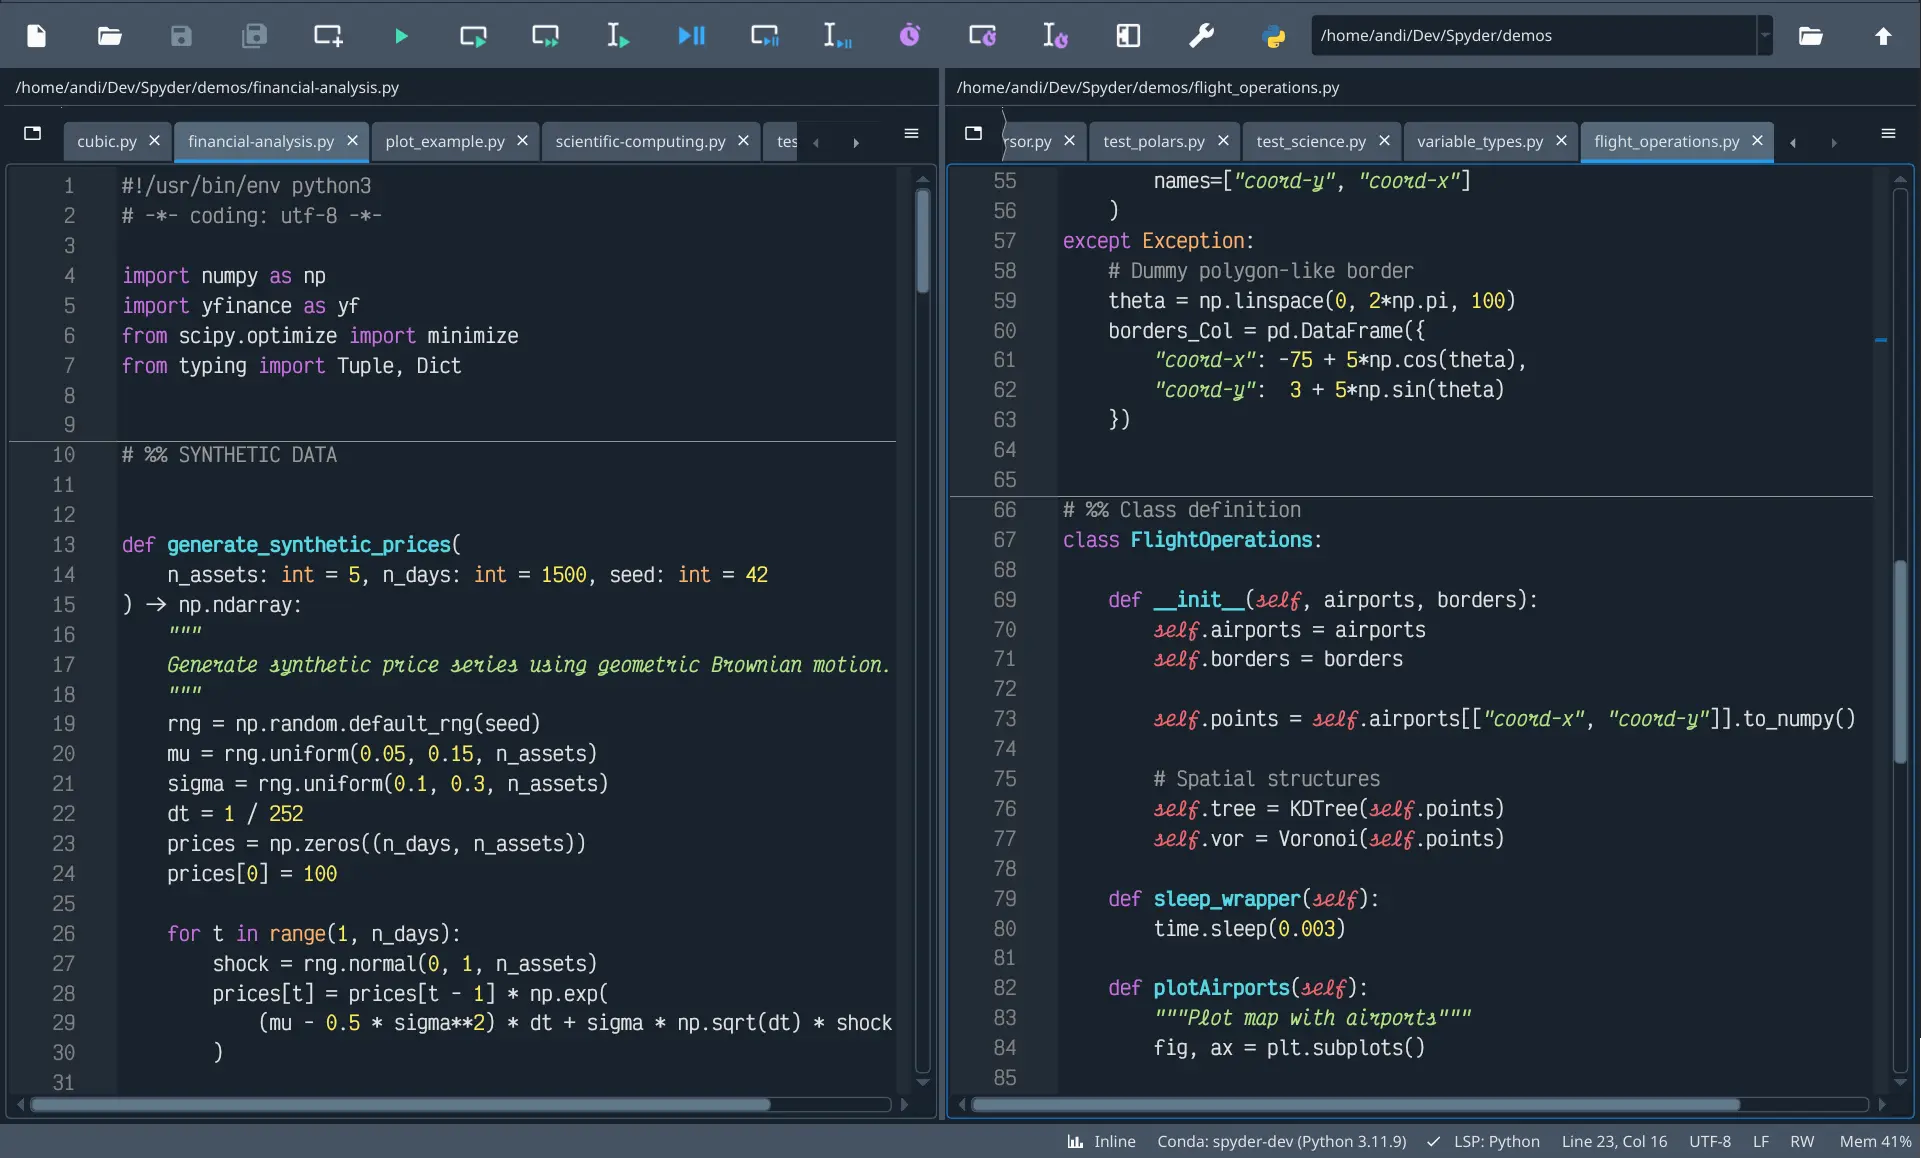
Spyder’s multi-language Editor pane is the core element of the IDE, where you can create, open, and modify source files. The Editor offers a variety of core features, such as autocompletion, real-time analysis, syntax highlighting, horizontal and vertical splitting, and much more. In addition, it integrates a number of powerful tools for an easy to use, efficient programming experience.
Componentes clave#
El panel del Editor consta de las siguientes áreas:
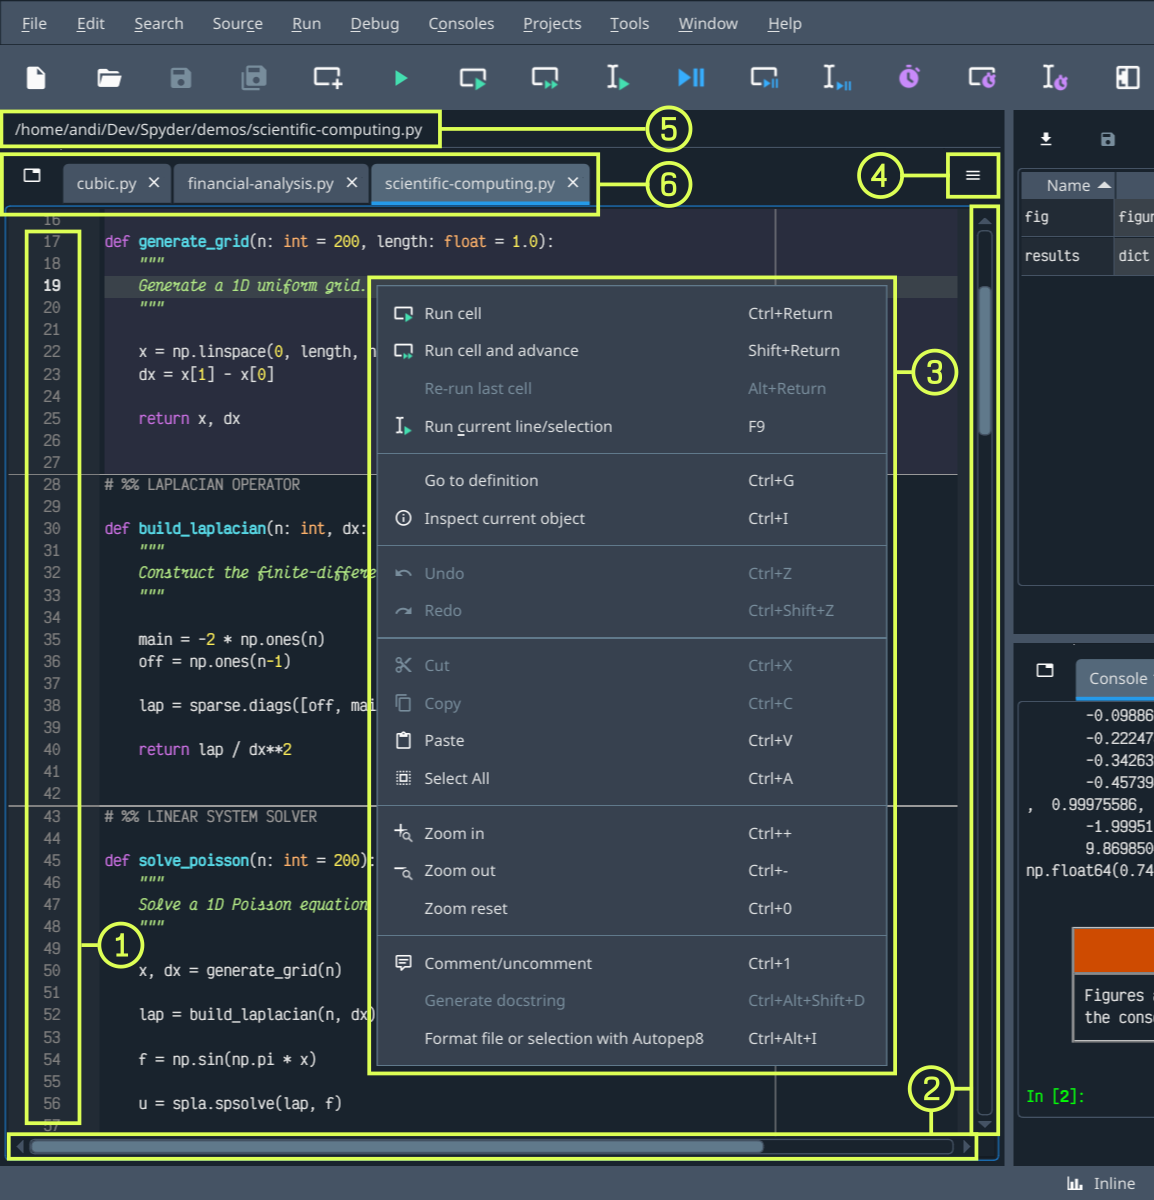
The left sidebar shows line numbers and displays any code analysis warnings that exist in the current file. Clicking a line number selects the text on that line, and clicking to the right of it sets a breakpoint.
Las barras de desplazamiento permiten la navegación vertical y horizontal en un archivo.
El menú contextual (clic derecho) muestra acciones relevantes a cualquier cosa que se haya seleccionado.
The options («hamburger») menu at the top right includes useful settings and actions for the Editor.
The location bar at the top of the pane shows the full path of the current file.
La barra de pestañas muestra los nombres de todos los archivos abiertos. También tiene un botón Navegar por las pestañas (a la izquierda) para mostrar cada pestaña abierta y cambiar entre ellas, que es útil si muchas están abiertas.
Interfaz#
Pestañas#
Puedes explorar y navegar entre archivos abiertos en el Editor con pestañas. Haz clic en el botón Navegar por las pestañas a la izquierda de la barra de pestañas para mostrar una lista de archivos abiertos, con la pestaña activa seleccionada.
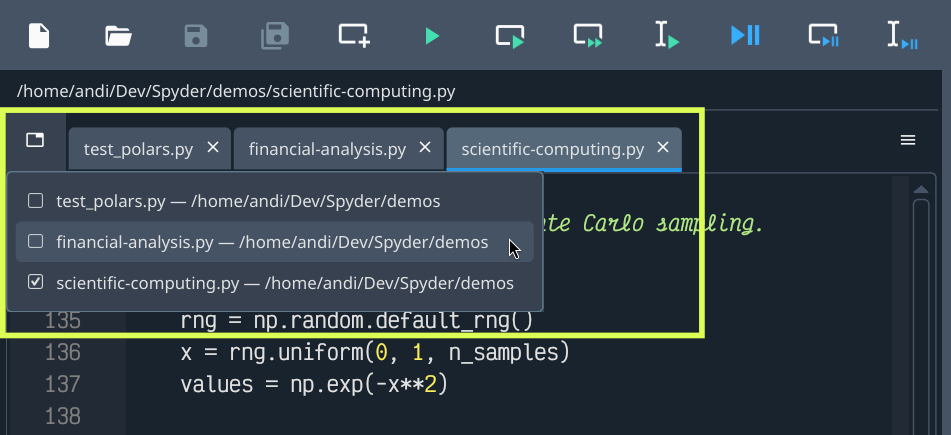
Reorder tabs by dragging and dropping, or with Sort tabs alphabetically in the options menu, which also allows closing all tabs to the left, right, or all but the active one.
Cambiador de archivos#
The Editor features a file switcher, accessed from the menu or via the Ctrl-P shortcut (Cmd-P on macOS). This allows browsing a list of files open in the Editor and present in your current project, if one is opened; click any file to jump to it.
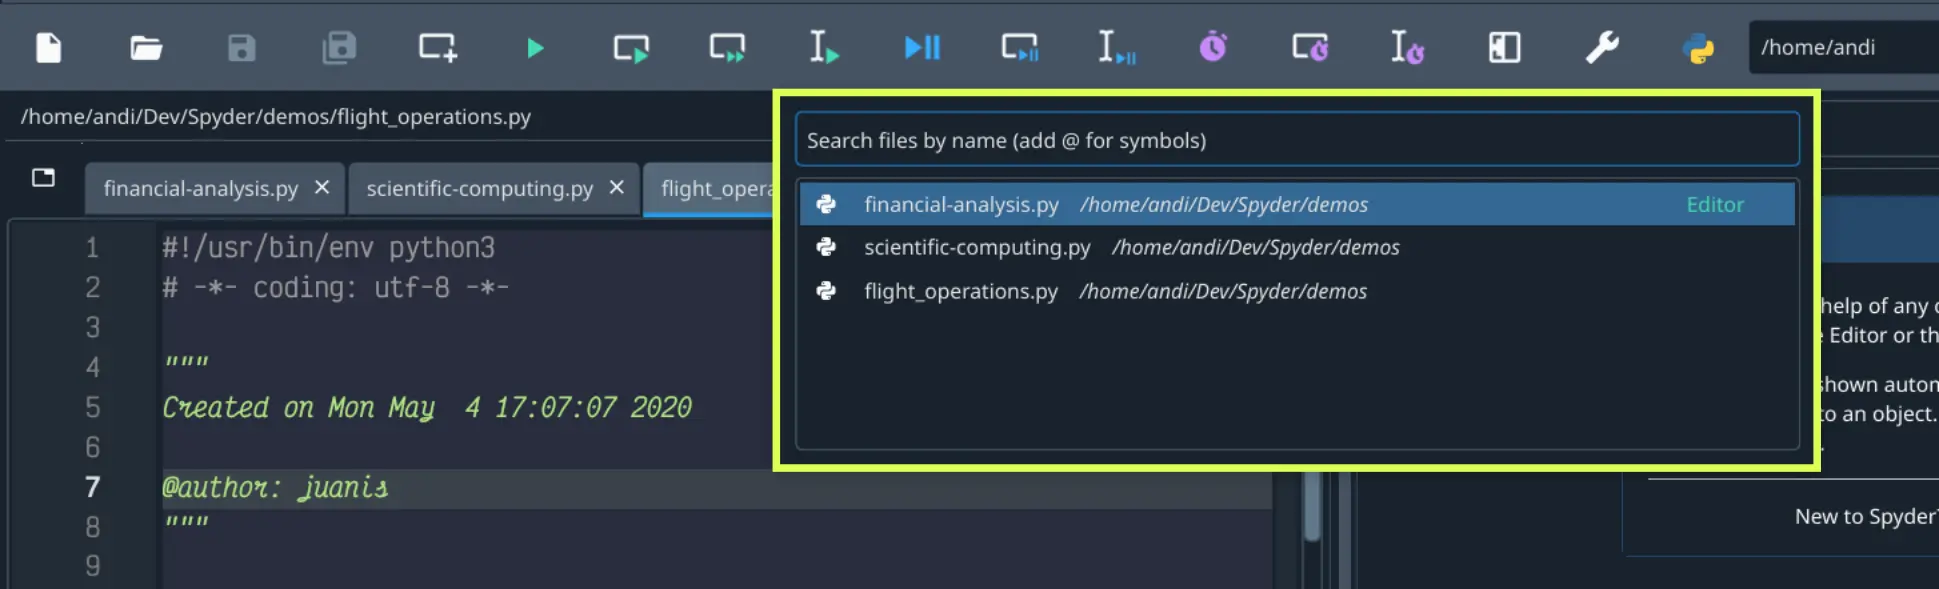
You can type any part of an open or project file’s name and the list will be filtered accordingly; pressing Enter will give focus to or open the currently-selected file, respectively.
Nota
Including all files from the current project in the search is supported when Spyder is installed via our recommended standalone installers or Conda, but not Pip.
Dividir paneles#
El Editor puede dividirse horizontal y verticalmente en tantos paneles distintos como se desee. Esto permite visualizar y editar el contenido de varios archivos (o partes diferentes del mismo archivo) al mismo tiempo.
Divide el Editor con los comandos en el menú de opciones Dividir verticalmente (Ctrl-Shift-{) y Dividir horizontalmente (Ctrl-Shift--), y utiliza Cerrar este panel (Alt-Shift-W) para cerrar el panel de división seleccionado.
Nota
cierra un panel dividido, mientras que oculta todo el panel del editor (incluyendo todas las divisiones, que se restauran cuando se vuelve a abrir el Editor).
Editar características#
Coloreado de sintaxis#
To improve the readability of your code, Spyder has a syntax highlighting feature that determines the color and style of text in the Editor, as well as in the Terminal de IPython.
You can configure and preview syntax highlighting themes and fonts under . The Syntax highlighting theme section allows you to change the color and style of the syntax elements and background to match your preferences. You can switch between available themes in the drop-down menu, modify the selected theme, create a new theme, and more. The Fonts section lets you change the interface and code font and size.
Nota
If Automatic is selected in the Main interface section, changing the syntax highlighting theme from dark to light will automatically change Spyder’s overall interface theme to match.
Celdas de código#
A «code cell» in Spyder is a block of lines, typically in a script, that can be executed all at once in the current Terminal de IPython. This is similar to «cell» behavior in Jupyter Notebook and MATLAB. You can divide your scripts into as many cells as needed, or none at all—the choice is yours.
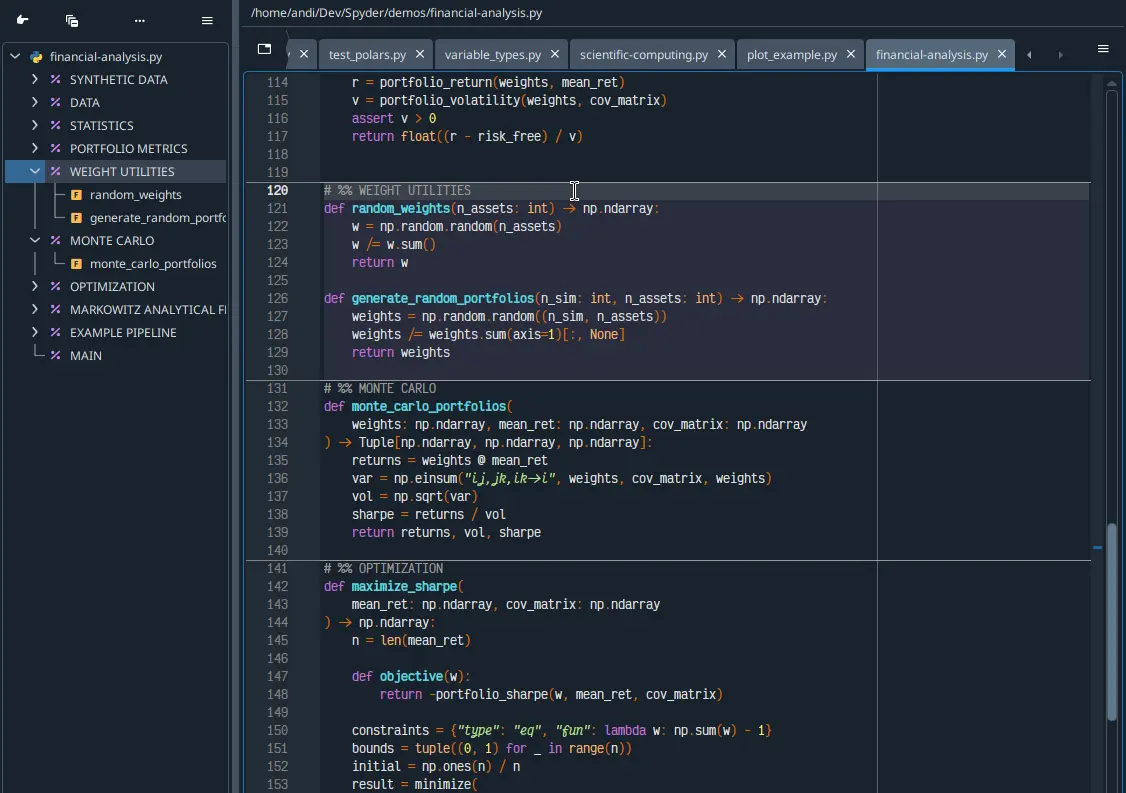
Puedes separar las celdas por líneas comenzando por:
# %%(separador estándar de celda), o# <codecell>(separador de celdas de notebook IPython)
Providing a description to the right of the separator will give that cell its own name in the Explorador de código.
You can also create «subsections» by adding more % signs to the cell separator, e.g. # %%% to create a level 2 subsection, # %%%% for level 3, etc.
This displays as multiple hierarchical levels in the Explorador de código pane.
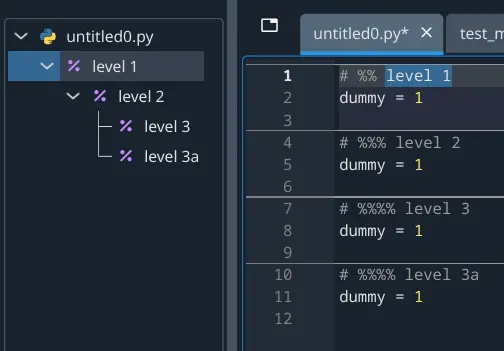
Nota
This only affects how the cell is displayed in the Explorador de código, and doesn’t affect running it in the Editor.
To run the code in a cell, use , the Run cell button in the toolbar or the keyboard shortcut (Ctrl-Enter/Cmd-Return by default). For more about the different ways you can run code in cells, see Ejecutar celda.
Formato automático#
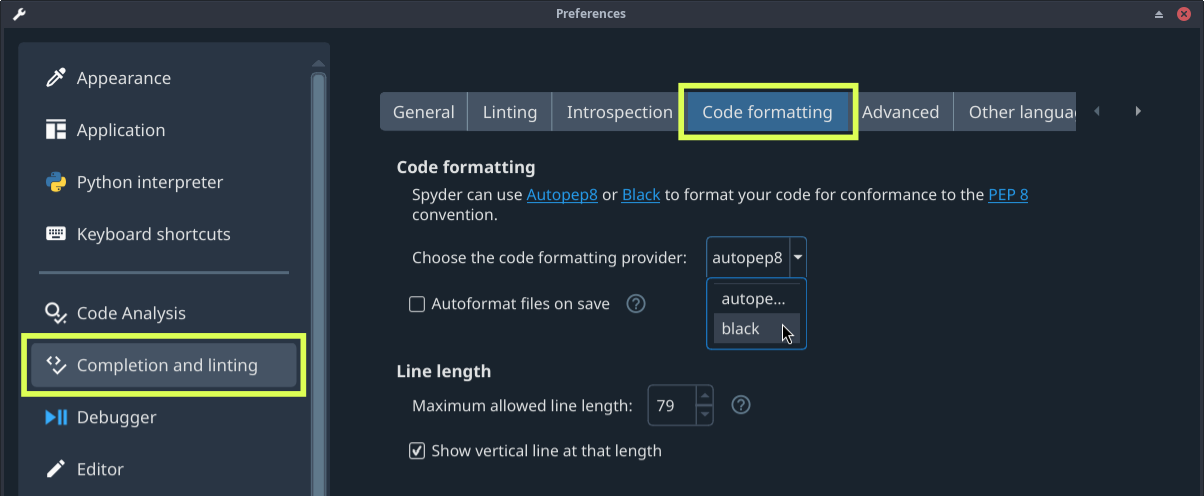
The Editor has built-in support for automatically formatting your code using several popular tools, including Autopep8, Black and Ruff. The Format file or selection with {tool} command in the Source or context menu will format either the selected fragment (if text is selected) or the entire active file.
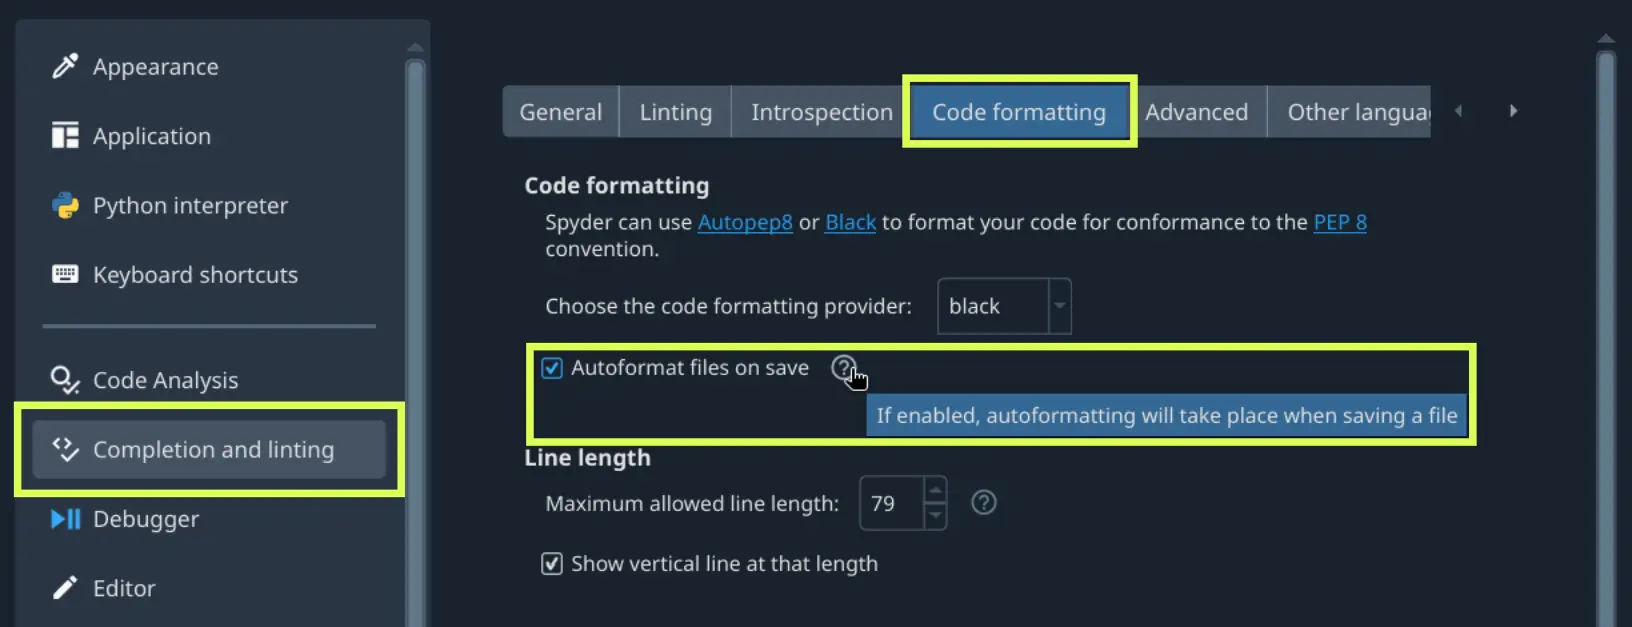
You can have the Editor automatically format your files every time you save them. To set this up, go to and check the Autoformat files on save option.
Ejecutar código#
El Editor te permite ejecutar un archivo completo, así como líneas específicas, selecciones o celdas.
Mientras tu código se ejecuta,
The Terminal de IPython will display output and errors.
The Explorador de variables allows you to browse and interact with the objects generated.
The Gráficos pane renders the figures and images created.
Ejecutar archivo#
Run an entire Editor file using the menu item, the Run file toolbar button or the F5 key. Use to re-run the most recent script executed with the above.
Ejecutar celda#
To run a cell, place your cursor inside it and use the menu item, its corresponding toolbar button or the Ctrl-Enter / Cmd-Return keyboard shortcut. Use Run cell and advance in the Run menu/toolbar or Shift-Enter to jump to the next cell after running, useful for stepping through cells quickly.
Ejecutar línea/selección#
You can execute the current line—or multiple selected lines—using the Run current line/selection option from the toolbar or the menu, as well as with the F9 key (by default). After running the current line, the cursor automatically advances to the next one, so you can step through your code line by line. Unlike Run file or Run cell (by default), the executed lines are shown in the Terminal de IPython.
Configuración de ejecución#
You can use the Run configuration dialog to set each file’s working directory, console mode (current, dedicated or external), command line arguments, execution options (clear all variables, run in an existing/empty namespace, debug on error), and more.
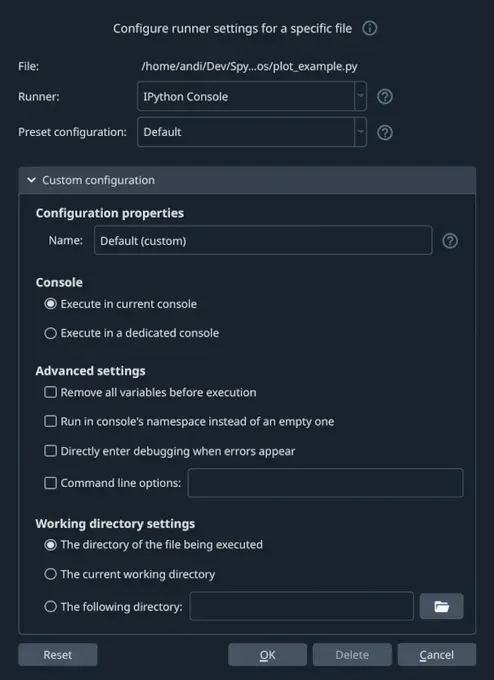
To access it, click or press Ctrl-F6 / Cmd-F6. The Runner drop-down allows to configure settings for the different runners capable of executing your files, including the Depurador (Debugger), Perfilador (Profiler), Análisis del código, as well as running in an external system terminal. To configure settings for running in the default Terminal de IPython, select IPython Console. The relevant options for each runner can be set under Custom configuration, and you can save them as presets by giving them a Name and clicking OK. You can then switch between different presets from the Preset configuration dropdown below the Runner selection.
Navegación por código#
Buscar y reemplazar#
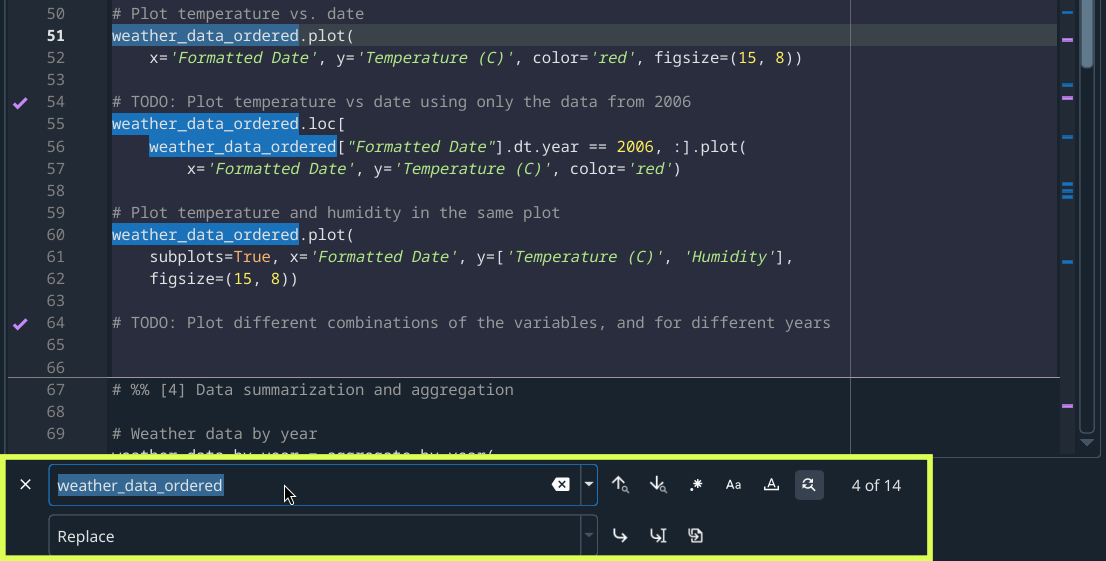
To search for text in the current file, use or Ctrl-F / Cmd-F, and to replace it, use or Ctrl-R / Cmd-R.
Typing your search string in the resulting panel below the Editor highlights each result and counts the total.
Navigate between matches with the Find previous and Find next buttons in the find/replace panel (up and down arrows), their corresponding entries in the Search menu, or use the F2 and F3 keys.
Use the .* button to process search text as a regular expression, Aa to treat it as case-sensitive and [A] to only match whole words (e.g. for data, match data() but not dataframe).
For replacing, there are also options to replace the next occurrence or all in the current selection or file.
Ir a la línea#
El diálogo Ir a la línea permite saltar a una línea específica en el archivo activo. Abrelo con o Ctrl-L / Cmd-L, escribe el número de línea al que quieres desplazarte y pulsa Enter (o haz clic en OK).
También muestra el número de línea actual y el recuento total de líneas en el archivo.
Selector de clase/función#
This panel, activated under , displays (as applicable) the name of the cell, function/method and class the Editor cursor is located inside. Use its dropdowns to view and jump to the functions, methods and classes in the current file.
Completado y análisis del código#
Spyder utiliza el Protocolo de Servidor de Idioma (LSP) para proporcionar el completado de código y linting para el Editor, similar a VSCode, Neovim, y otros editores/IDE populares.
Nota
Many issues with completion and linting are outside of Spyder’s control, and are either limitations with the LSP or the code that is being introspected, but some can be worked around. See El autocompletado o la ayuda no funcionan for troubleshooting steps.
Python está soportado por defecto, y los usuarios avanzados pueden añadir soporte de completado y linting para otros idiomas configurando los servidores LSP en .
Completado de código#
El completado automático de código está activado de forma predeterminada en el Editor mientras escribes, pero también puede ser activado manualmente con Ctrl-Space/Cmd-Space, el cual muestra las posibles formas de completar (con una ayuda emergente para cada una) y los fragmentos de código disponibles. Por ejemplo, escribir cla mostrará la palabra clave class, el decorador classmethod y dos fragmentos incorporados con plantillas de clases. Selecciona la terminación deseada con las teclas de flecha y Enter, o haciendo doble clic.
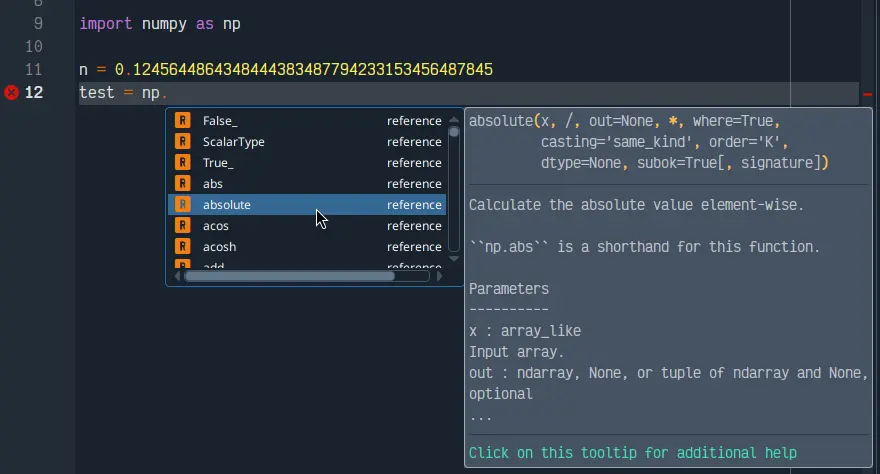
You can enable or disable on-the-fly code completion, as well as modify when it is triggered and what results are shown, under . Spyder also allows you to define custom completion snippets to use, in addition to the ones offered by the LSP, under .
Linting y estilo de código#
Spyder puede resaltar opcionalmente errores de sintaxis, problemas de estilo y otros problemas potenciales con tu código en el Editor, lo que puede ayudarte a detectar errores rápidamente y hacer que tu código sea más fácil de leer y entender.
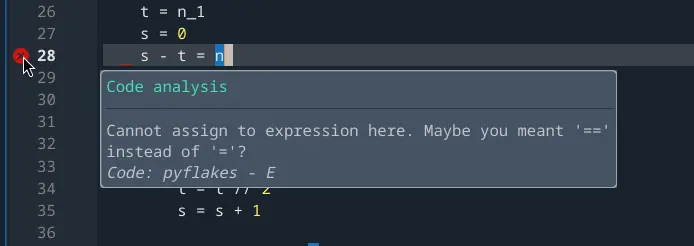
The Editor’s real-time linting warns of syntax errors and likely bugs in your code. It is on by default, and can be disabled or customized under . The linting providers available include:
Pyflakes (default), which detects basic errors.
Flake8, which incorporates error checks, code style linting and complexity analysis.
Ruff, which includes a huge variety of configurable lint rules covering a wide gamut of possible issues in your code.
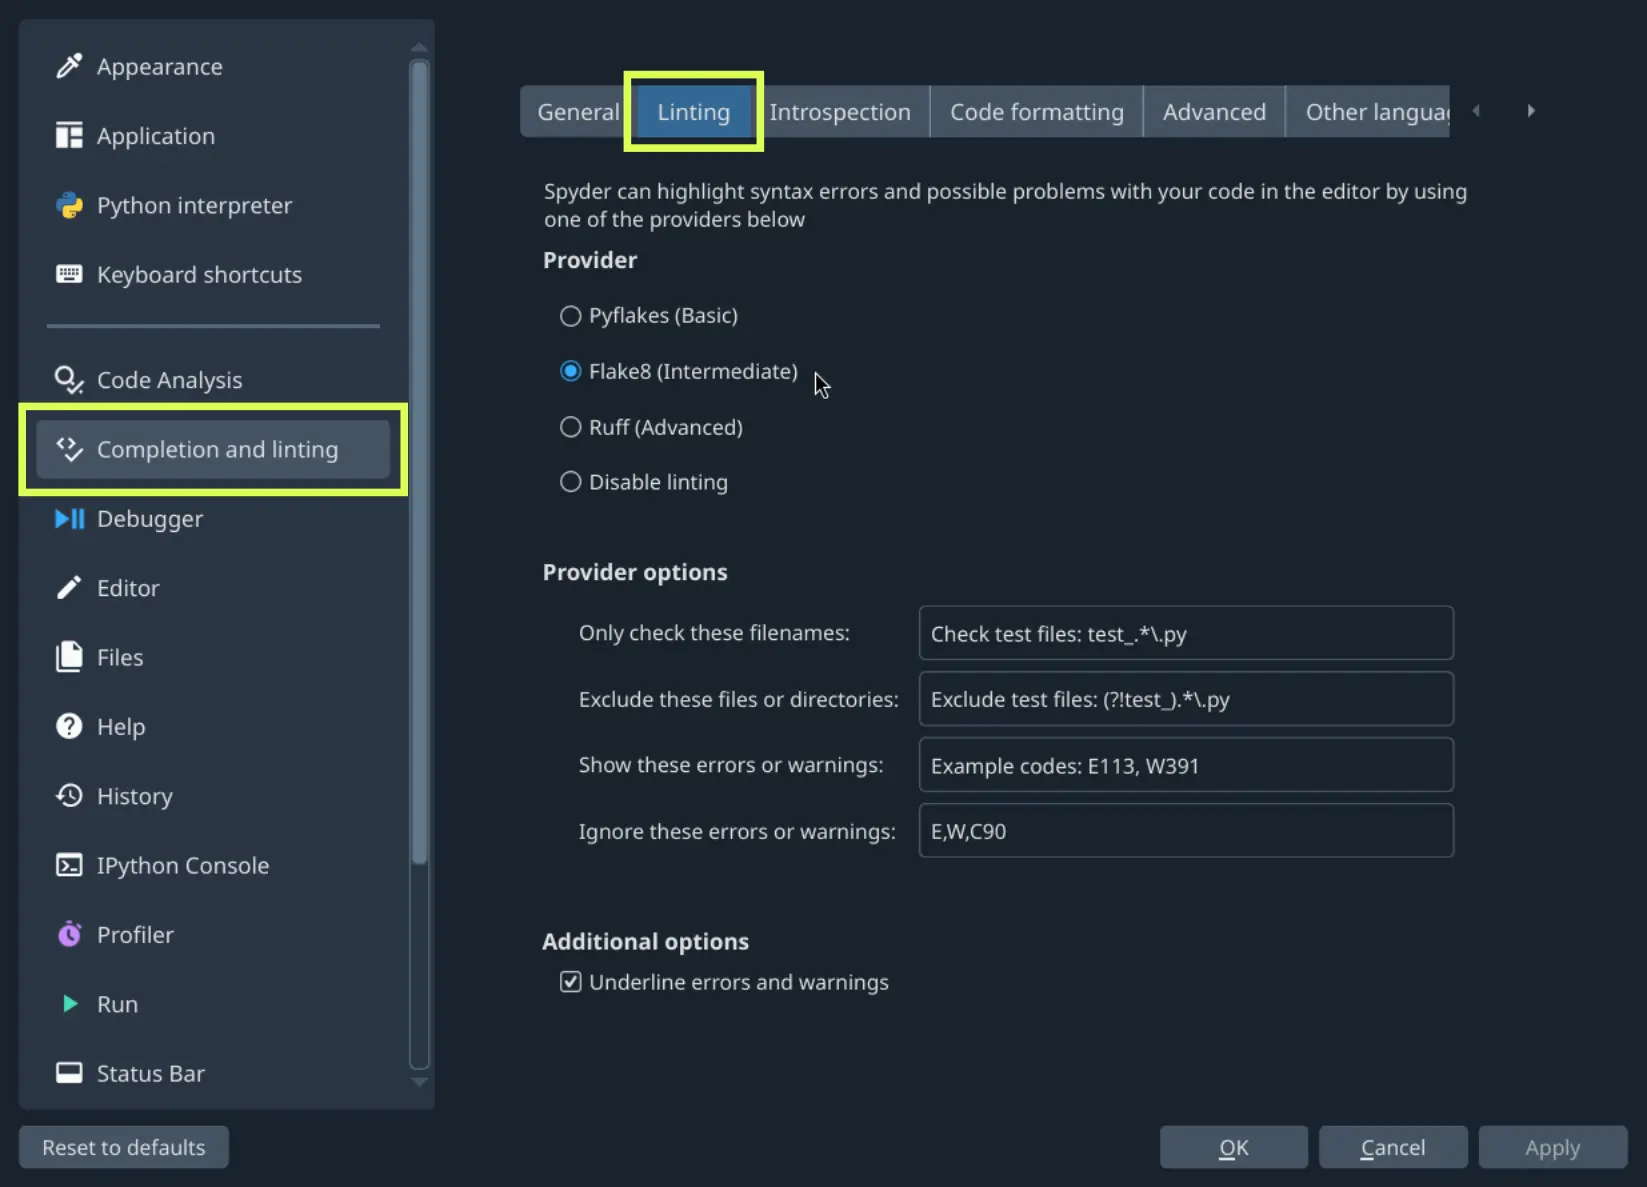
Flake8 and Ruff enable a default set of checks that aims to strike a balances between catching errors and potential problems, and issuing too many warnings, with Spyder additionally disabling some style-related checks by default. You can override these defaults or enable or disable any specific categories or individual checks using the Show/Ignore these errors or warnings fields and the rule prefix/numbers listed in their respective documentation (they use the same set of codes for the same checks, aside from a few cases where two third-party Flake8 checks have conflicting codes). You can also ignore or only check specific files by name or regular expression using the Only check these filenames and Exclude these files or directories options.
Características de introspección#
If there’s a function, class or variable for which you would like to check its definition, hold Ctrl/Cmd and click its name in the Editor to jump to the file and line where it is declared.
You can hover over the name of an object for pop-up help, as described in the Help pane docs.
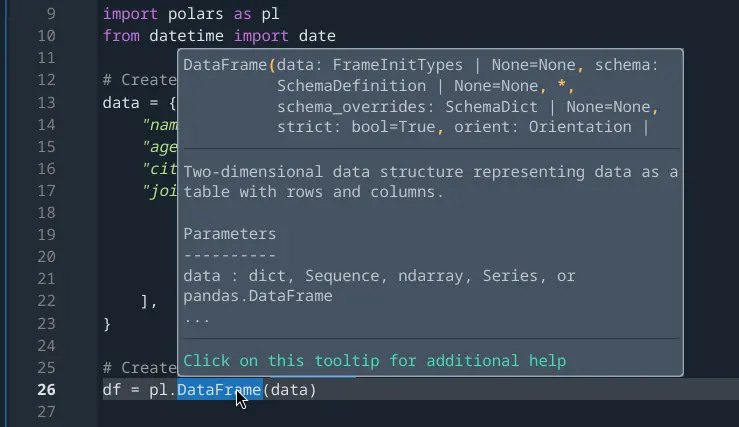
Finalmente, si escribes el nombre de una función, método o constructor de clase y luego un paréntesis abierto, aparecerá un calltip que mostrará los parámetros de la función a medida que los escribas, así como un resumen de su documentación. Estas características pueden ser habilitadas y personalizadas bajo .
Atajos de teclado#
Para ver los atajos de teclado primarios del Editor, consulta la sección bajo . La lista completa se puede buscar, buscar y personalizar (en doble clic) en .