Frequently Asked Questions#
Installing and updating#
Q: How do I install Spyder?
The easiest way to use Spyder is with our standalone installer, which comes with everything you need to get started in an all-in-one package. Download it from the Spyder Download Page.
For more information, visit our Install Guide.
Q: How do I install Spyder on Windows Subsystem for Linux 2 (WSL2)?
If you already installed Spyder on your Windows machine, you do not need to reinstall it on a WSL2-based Linux environment to run your code there.
Instead, just create a new Conda or venv/virtualenv environment (using system Python without a venv is not recommended), then install Spyder-Kernels into that environment with e.g. conda install spyder-kernels.
Note
Windows creates a network path located at \\wsl$ that points to the partitions of your WSL2 machines, e.g. \\wsl$\Ubuntu-20.04.
You must map a network drive letter to your machine path, e.g. W:, for Spyder to correctly see its files and folders.
To start a Spyder kernel, from your Linux terminal run
python -m spyder_kernels.console --matplotlib="inline" --ip=127.0.0.1 -f=~/remotemachine.json &
It will run the kernel as a subprocess and create a file named remotemachine.json in your WSL home folder.
Finally, under the options menu of Spyder’s IPython Console, select Connect to existing kernel as described in Using external kernels.
Insert the absolute path of remotemachine.json into the Connection file field.
If you mapped W: as mentioned in above note, the path should be W:/home/username/remotemachine.json.
A new console will open in Spyder, running in the Linux environment.
Try running !ls -la and see if it lists your WSL home folder.
If you run exit() from Spyder, the kernel running on Linux will be stopped.
Q: How do I update Spyder using the standalone installer?
An updater is built right into the standalone-installed Spyder, and will check for updates when starting the application and prompt you when one is available. You can also trigger an on-demand check for updates via . Simply click through the prompts to confirm and install the update.
Q: How do I update Spyder using conda?
From the command line (or Anaconda Prompt on Windows), run:
conda update anaconda  # ONLY IF USING THE ANACONDA BASE ENVIRONMENT
conda update spyder
If this results in an error or does not update Spyder to the latest version, try:
conda install spyder=6
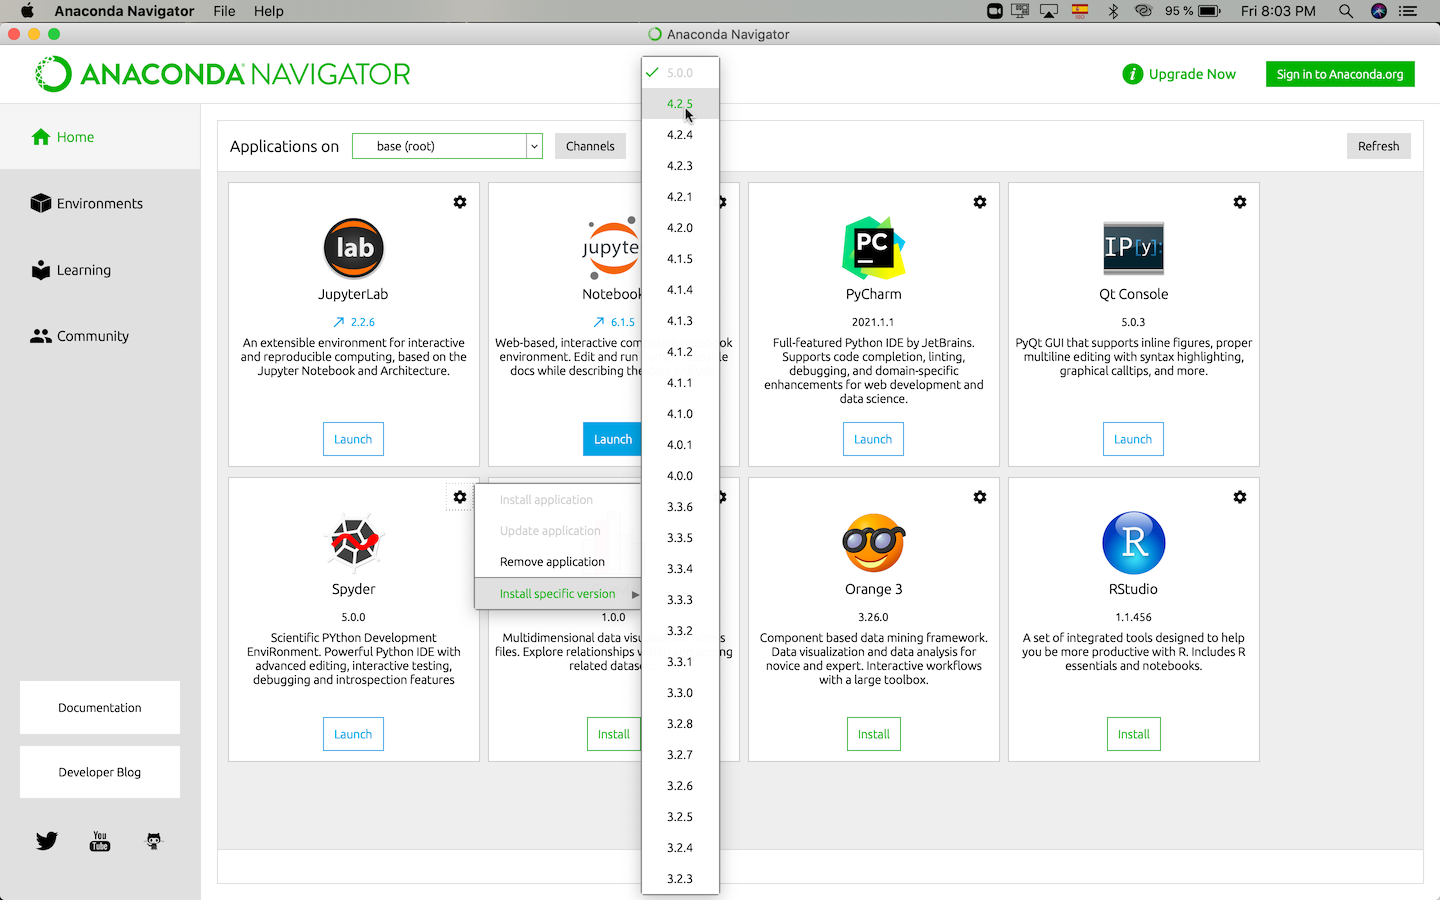
Q: How do update I Spyder using Anaconda Navigator?
Open the “gear” menu in Spyder’s section under Home in Navigator. Go to Install specific version and select the version of Spyder you want to use. We strongly recommend the latest available, to benefit from new features, bug fixes, performance improvements and usability enhancements.
Running Spyder#
Q: How do I run Spyder?
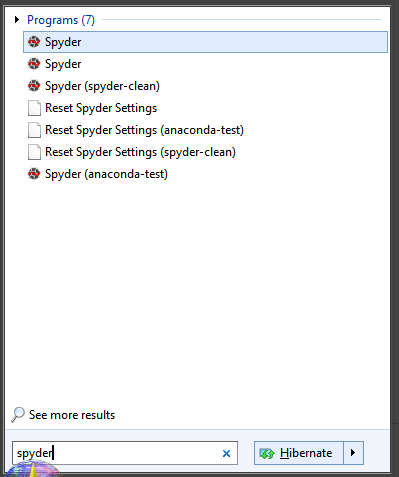
With Spyder installed standalone (recommended) or via a Conda-based method, a shortcut is created so you can run it right from your normal operating system application launcher (the Start menu on Windows, Spotlight/the Applications folder on macOS, or your distro’s launcher on Linux). Your operating system will typically allow you to pin this shortcut for even quicker access (to the Taskbar on Windows, the Dock on macOS or your distro’s quick launcher on Linux). If installed via Conda in its own environment, the shortcut will have the environment name in its title, and multiple shortcuts for different Spyder environments may be available.
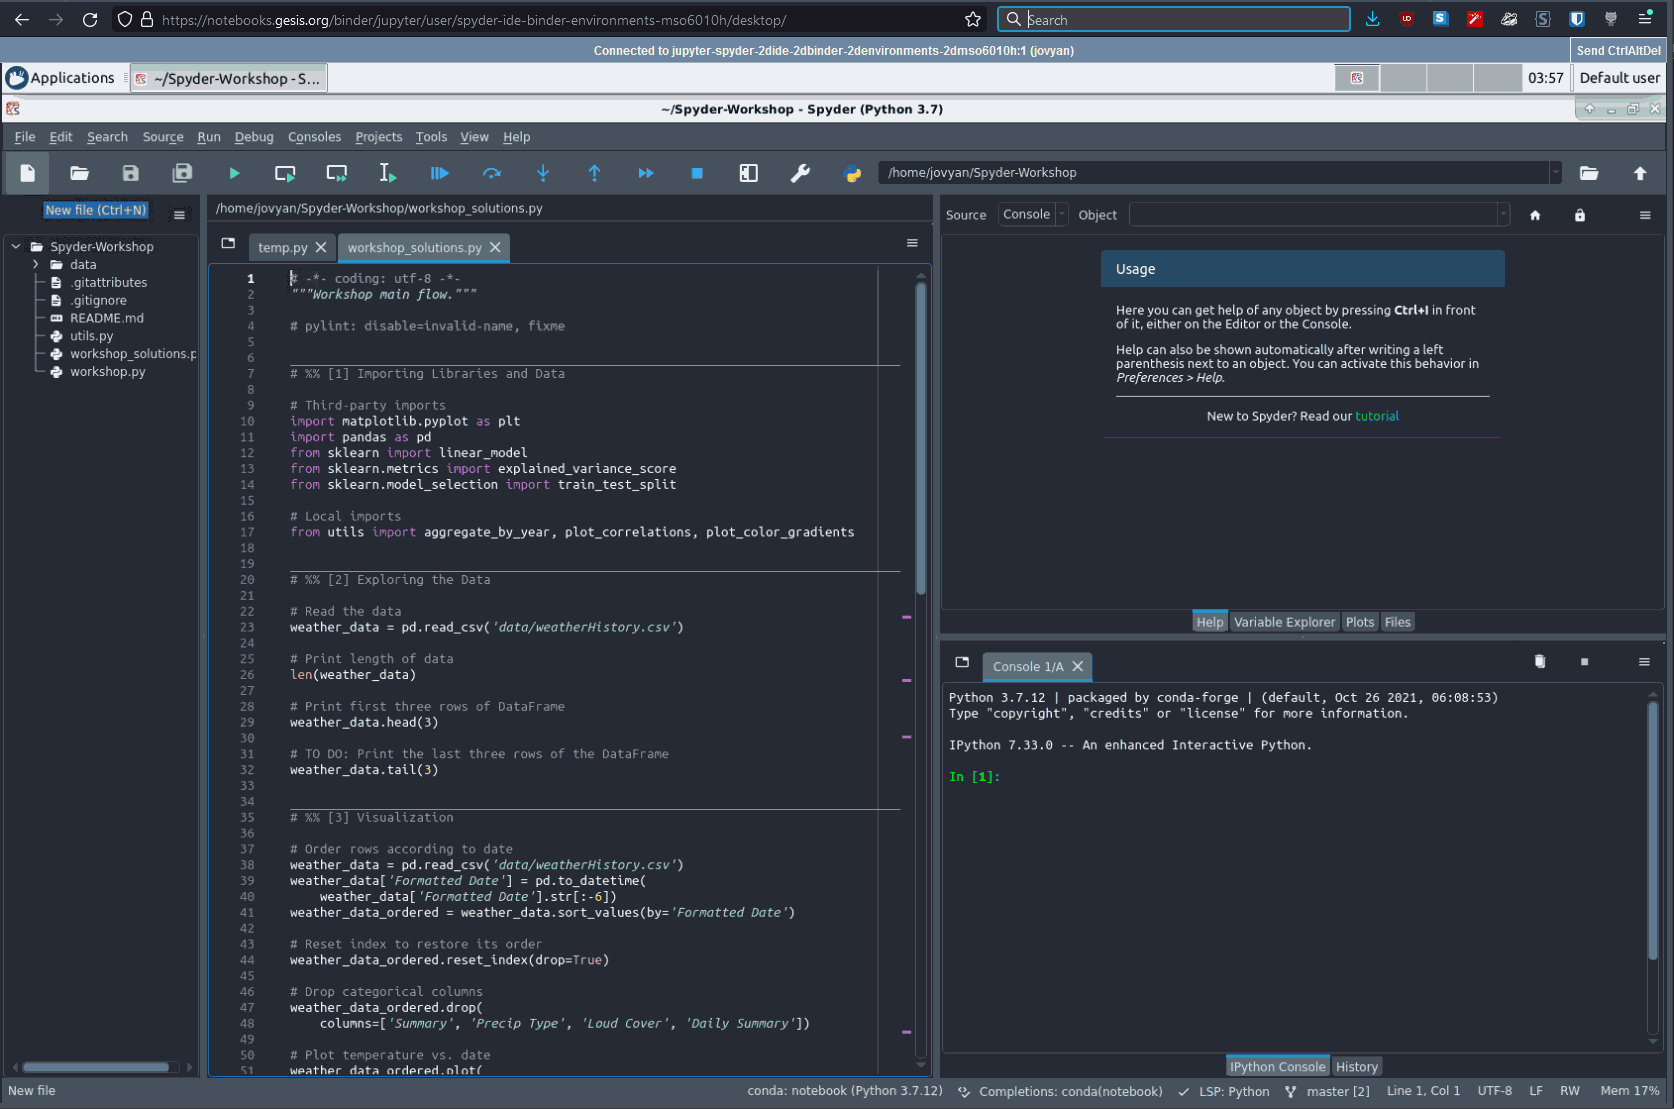
Q: Can I try Spyder without installing it?
Yes! With Binder, you can work with a fully functional copy of Spyder that runs right in your web browser. Visit the Spyder Binder page to get started.
Caution
This is a temporary environment, and any code or data you create will be lost once you close your browser tab or navigate away from the page.
Q: What are the system requirements for Spyder? How resource-intensive is it?
Spyder works on modern versions of Windows, macOS and Linux (see the table below for recommended versions). It typically uses relatively minimal CPU when idle, and 0.5 GB - 1 GB of RAM, depending on how long you’ve been using it and how many files, projects, panes and consoles you have open. It should work on any system with a dual-core or better x64 processor and at least 4 GB of RAM, although 8 GB is strongly recommended for best performance when running other applications. The code you run, such as scientific computations and deep learning models, may require additional resources beyond this baseline for Spyder itself.
Operating system |
Version |
|---|---|
Windows |
Windows 10 |
macOS (Intel) |
Ventura (13) |
macOS (M1+) |
Sonoma (14) |
Linux |
Ubuntu 22.04 |
Q: How do I run Spyder installed in an environment using the command line?
If necessary, activate the environment Spyder was installed in by typing the appropriate command in your terminal (or Anaconda Prompt on Windows); for example, with Conda:
conda activate ENVIRONMENT-NAME
Then, type spyder to launch the version installed in that environment.
Q: How do I run Spyder using Anaconda Navigator?
While not recommended, if you’ve installed Spyder via Anaconda it can also be launched from Anaconda Navigator by scrolling to Spyder under Home and clicking Launch.
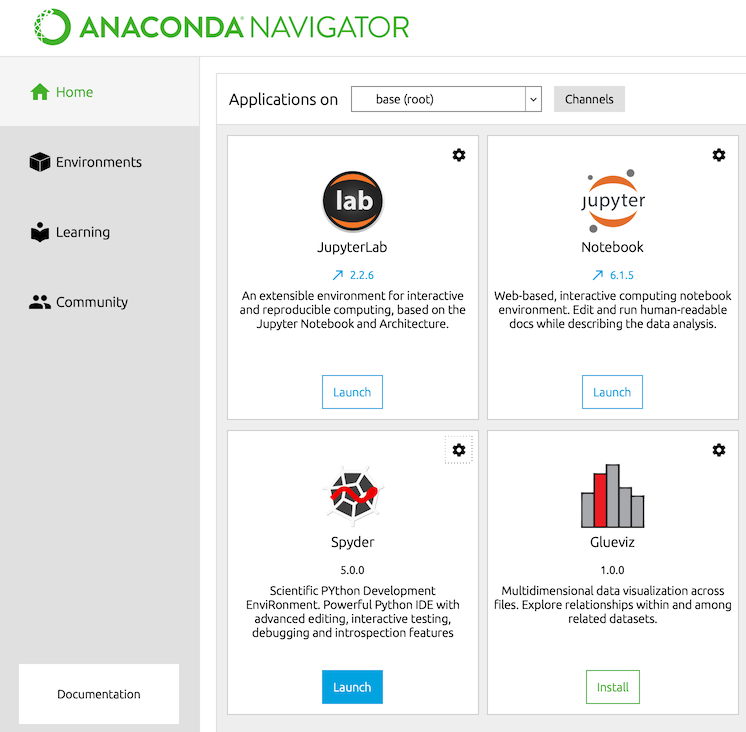
To run the copy of Spyder installed in a specific environment, select the environment you want to launch Spyder from under Applications on. If Spyder is installed in this environment, you will see it in Navigator’s Home window. Click Launch to start Spyder in your selected environment.

Using Spyder#
Q: How do I install Python packages to use within Spyder if I installed Spyder with Conda?
The first approach for installing a package should be using conda. In your system terminal (or Anaconda Prompt on Windows), type:
conda install <PACKAGE-NAME>
If your installation is not successful, follow steps 3 through 5 of Part 2 in our video on solving and avoiding problems with pip, Conda and Conda-Forge.
Q: How do I get Spyder to work with my existing Python packages/environment?
You can open a new console in an existing Conda or Pyenv environment using the New console in environment submenu of the Consoles menu or the tab context menu of the IPython Console pane.
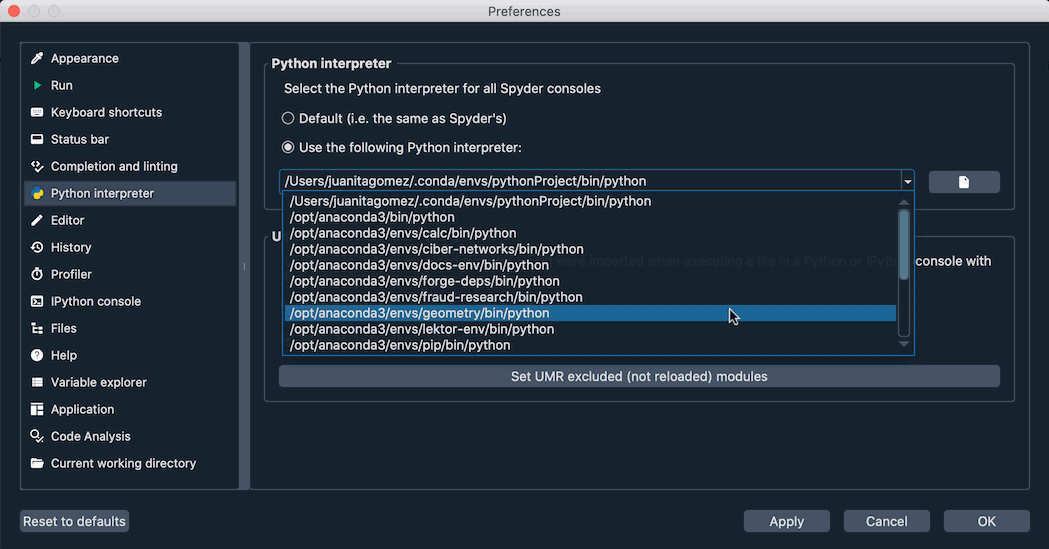
You can manually add other virtual environments not located at standard paths, as well as change the default environment for new IPython Consoles, in the Python interpreter section of Spyder’s Preferences. This can be quickly accessed by clicking the current environment name in Spyder’s status bar, then Change default environment in Preferences…. Here, click the option Select interpreter and use the dropdown below to select your preferred environment. If it’s not listed, see the note below.
Note
If you installed a Conda-based distribution to a non-standard path, or are using a virtual environment managed by a tool other than pyenv, your environments likely won’t be listed by default.
For the former, you can specify the path to the Conda/Mamba executable under in the Python interpreter section of Spyder’s Preferences.
It is located at BASE INSTALL DIRECTORY/Scripts/conda.exe on Windows, and BASE INSTALL DIRECTORY/bin/conda on other platforms.
Otherwise, use the text box or the Select file button to manually add the path to the Python interpreter you want to use. You can find this path by activating the venv or Conda env you want to use in your terminal (Anaconda Prompt on Windows), and running the command:
python -c "import sys; print(sys.executable)"
Finally, click Restart kernel in the Consoles menu for this change to take effect.
If spyder-kernels is not already installed or outdated, the IPython Console will display instructions on how to install the right version (or offer to install it automatically, on Spyder 6.2+).
Execute the given command in your terminal (the Anaconda Prompt on Windows) with the environment activated, and finally restart the kernel once more.
Q: How do I install Python packages to use within Spyder if I downloaded Spyder from the standalone installers?
Watch our video on using additional packages or follow the instructions below.
If you want to use other packages in Spyder that don’t come with our installer, you need to have your own Python distribution installed; we recommend Miniforge or another Conda-based option. For Spyder to recognize your environments automatically without manual configuration, you should use a Conda-based distribution with its default install path.
Create a new Conda environment containing spyder-kernels and the packages that you want to use.
For example, if you want to use scikit-learn, open your terminal (or Anaconda Prompt on Windows) and run the following command:
conda create -n my-env -c conda-forge spyder-kernels scikit-learn
Finally, you can open a console in the my-env environment by selecting it in the New console in environment submenu of the Consoles menu or the tab context menu of the IPython Console pane.
You can also change Spyder’s default Python interpreter for new consoles following the instructions in the above answer.
Q: How do I use plugins with Spyder (e.g. Spyder-Notebook, Spyder-Terminal, Spyder-Unittest)?
First, you currently need to have Spyder installed in your own Conda or virtual environment, not via our standalone installer (this limitation will be removed in Spyder 6.2, which will feature a built-in graphical plugin manager).
A Conda-based install is strongly recommended; Spyder plugins are available in the conda-forge conda channel.
To install one, activate the environment in which you installed Spyder, and type the following on in your system terminal (or Anaconda Prompt on Windows):
conda install -c conda-forge PLUGIN
Replace PLUGIN with the name of the plugin you want to use.
For more information on a specific plugin, go to the its repository:
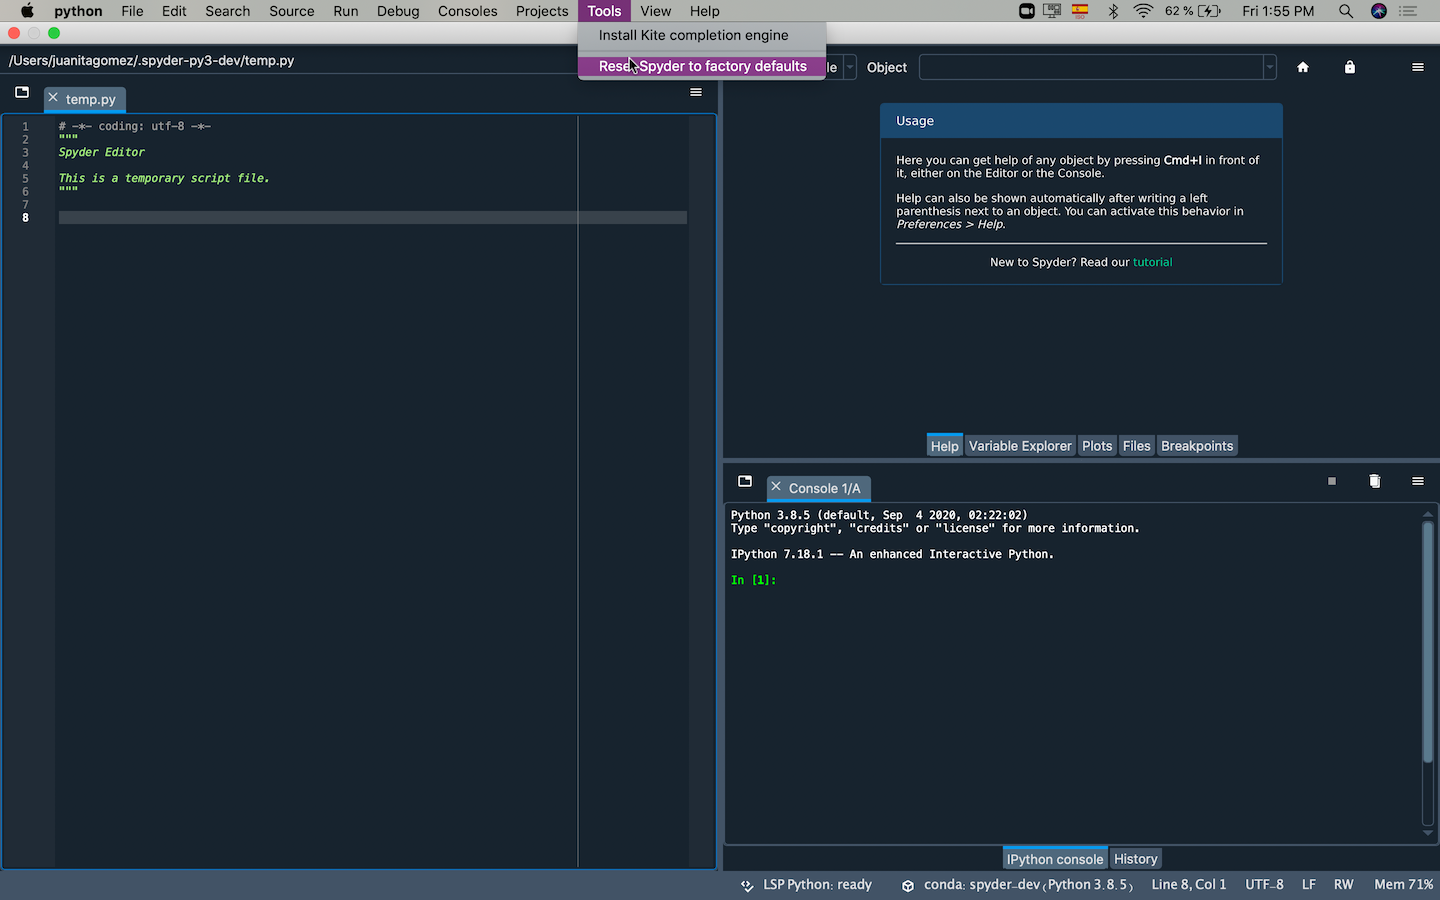
Q: How do I reset Spyder’s preferences to the defaults?
Do one of the following:
Select Reset all preferences to defaults under Tools in Spyder’s menu bar
Open Reset Spyder 6 to default settings operating system shortcut if available (e.g. in the Start menu on Windows)
Run
spyder --resetin your system terminal (Anaconda Prompt on Windows) after activating the environment Spyder is installed in.
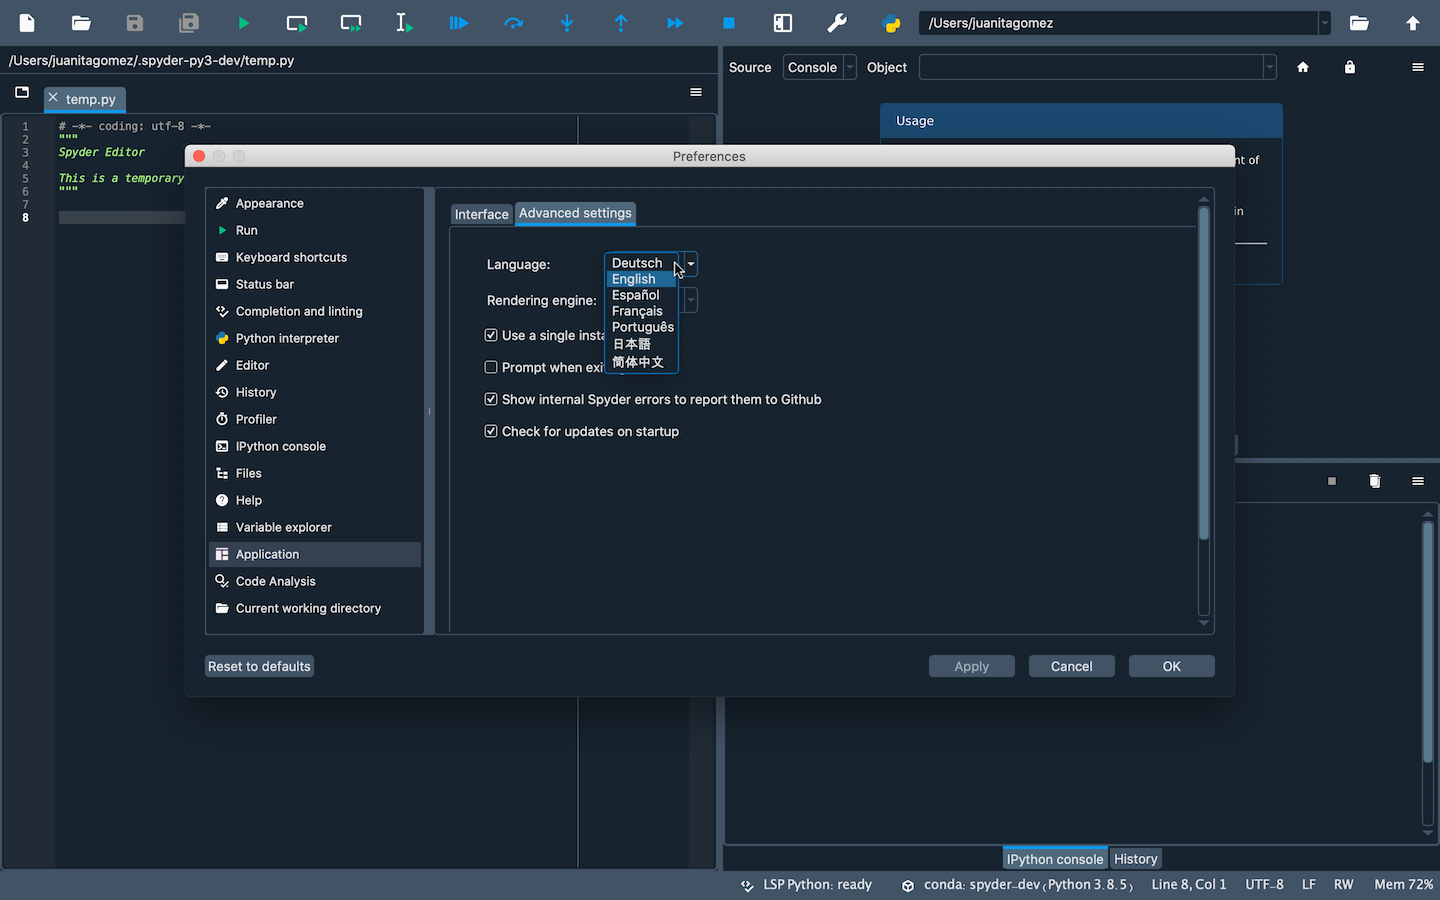
Q: How do I change Spyder’s language?
Under Application in Spyder’s Preferences, go to the Advanced settings tab and select your language from the options displayed under Language.
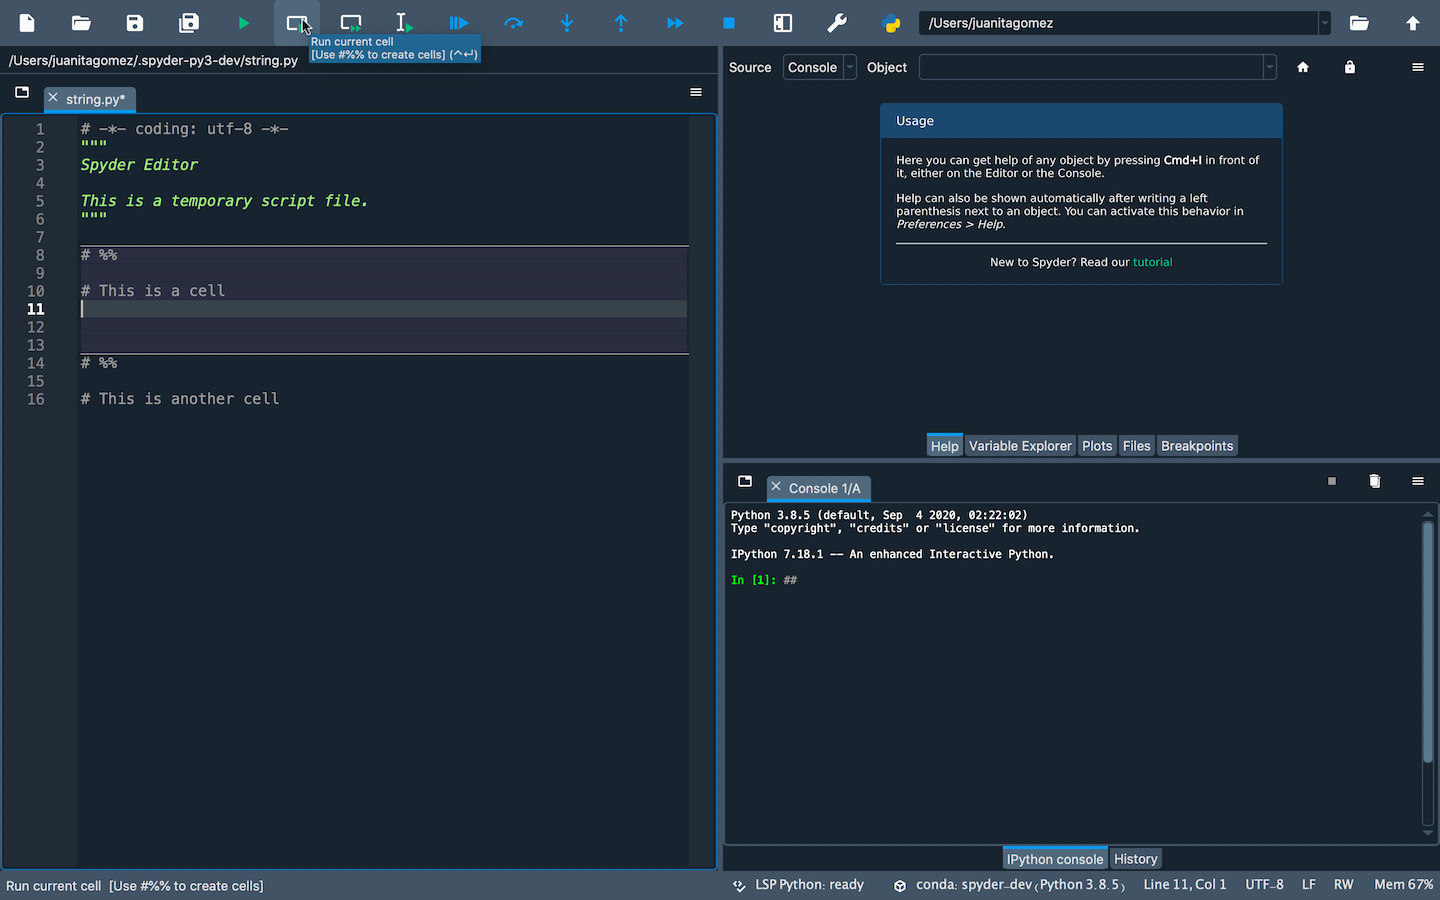
Q: How do I use code cells in Spyder?
To create a cell in Spyder’s Editor, type # %% (or #%%`) in your script.
Each ``# %% will make a new cell.
To run a cell, press Shift-Enter (while your cursor is focused on it) or use the Run current cell button in Spyder’s toolbar.
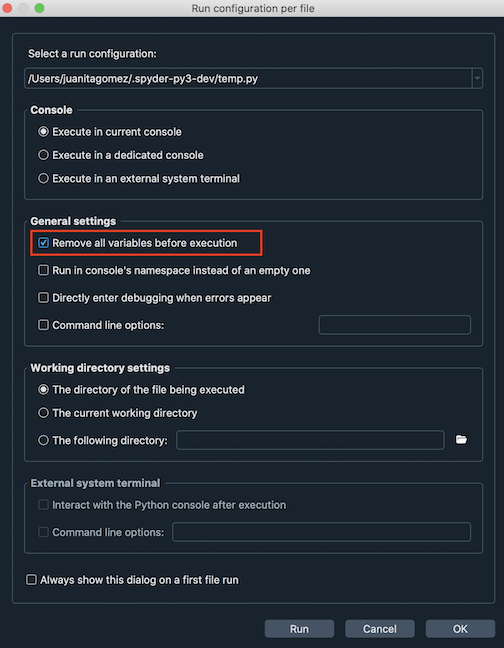
Q: How do I clear all variables before executing my code?
Check the option Remove all variables before execution of the Configuration per file dialog under the Run menu.
Q: How do I run my code in a dedicated console or control other run settings?
Select the appropriate option in the Custom configuration section of the Configuration per file dialog under the Run menu, or configure global defaults for all files in the Run pane of Spyder’s Preferences.
If you want to quickly switch between multiple groups of settings, you can save them to separate presets by setting a different Name under Configuration properties.
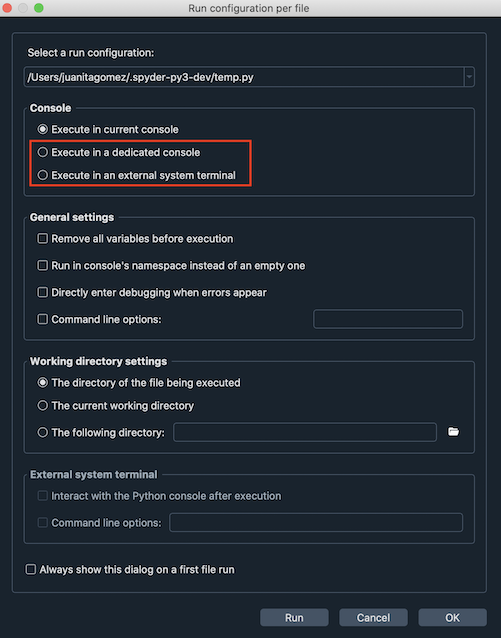
Q: How do I run my code in an external terminal?
As of Spyder 6, there is now a dedicated Run in external terminal item in the Run menu to do just that. You can also now set separate external terminal-specific run configuration options for the current file by selecting the corresponding Runner in the Run configuration per file dialog, and for all files in the Run entry in Spyder’s Preferences.
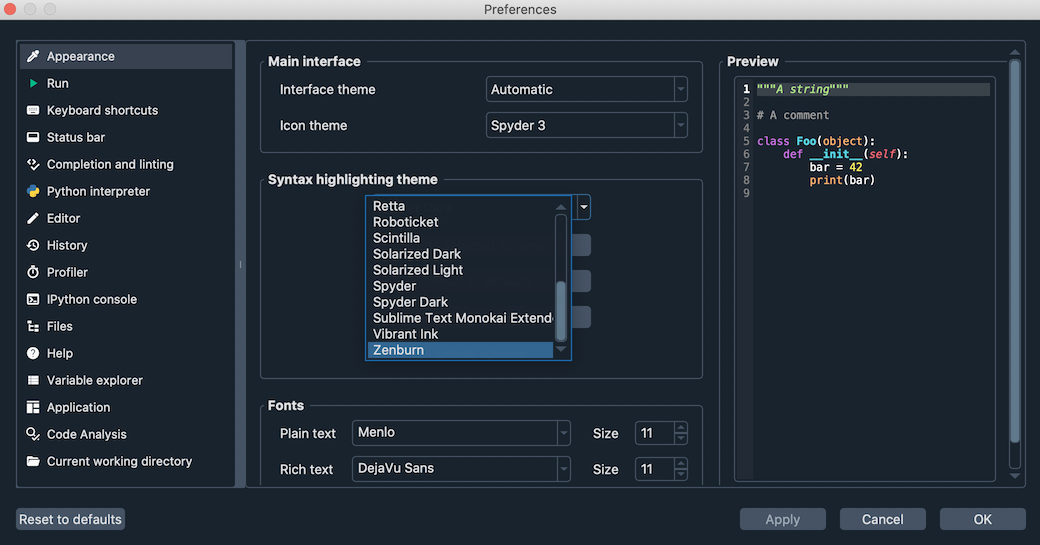
Q: How do I change the syntax highlighting theme in the Editor?
Go to Preferences and select the theme you want under Syntax highlighting theme in the Appearance section. You can also change Spyder’s global interface theme (light or dark) under Interface theme in that same preferences pane.
Troubleshooting#
Q: I’ve found a bug or issue with Spyder. What do I do?
You should first follow the steps in our troubleshooting guide. If you can’t solve your problem, open an issue by following the instructions in the Submit a Report section.
Q: I get an error in the IPython console running my code! Help!
First, make sure the error you are seeing is not a bug in your code. To confirm this, try running it in any standard Python interpreter. If the error still occurs, the problem is likely with your code and a site like Stack Overflow might be the best place to start. Otherwise, start at the Basic First Aid section of our troubleshooting guide.
Q: Code completion/help doesn’t work; what can I do?
If nothing is displayed in the calltip, hover hint or Help pane, make sure the object you are inspecting has a docstring, and try executing your code in the IPython Console to get help and completions there. If this doesn’t work, try restarting the LSP server by clicking the LSP: Python item in the status bar at the bottom of Spyder’s main window, and selecting the Restart Python Language Server option.
For more information, go to the Completion/help not working section in the Common Illnesses page of our troubleshooting guide.
Q: I get the message “An error occurred while starting the kernel”. How do I fix this?
First, make sure your version of Spyder-Kernels is compatible with that of Spyder. See the table in the Spyder-Kernels not installed/incompatible section of the troubleshooting guide to check.
To install the correct version, copy the suggested command Spyder displays for you in the error message and run it in a system terminal (Anaconda Prompt on Windows if using Conda) with the Python environment you want to use activated.
For more information, go to the Errors starting the kernel section in the Common Illnesses page of our troubleshooting guide.
About Spyder#
Q: What’s Spyder’s licensing situation? Is commercial use allowed?
Spyder is 100% free and open source; there is no paid version or prohibition on commercial use. It is developed by its international user community, and supported by its users through OpenCollective and by its generous sponsoring organizations, including Quansight and NumFOCUS. Our source code, standalone installers and most of our distribution methods (Pip/PyPI, Linux distros, MacPorts, WinPython, etc) can be freely redistributed, used and modified by anyone, for any purpose, including commercial use. For more details about the situation with Anaconda, see Q: What does Anaconda’s commercial licensing restrictions mean for Spyder?.
Q: What does Anaconda’s commercial licensing restrictions mean for Spyder?
If you installed Spyder via any method other than the Anaconda or Miniconda distributions, or install it from the conda-forge channel with those two distributions, you are not affected by any restrictions.
If you use a copy of Spyder installed by default with the Anaconda distribution, or installed from the defaults/anaconda channel, Anaconda’s Terms of Service have restrictions on larger (>200 employee) for-profit enterprises on a large scale.
However, these terms only apply to the package infrastructure (the full Anaconda distribution and the defaults conda channel).
Instead, you can simply download the similar Miniforge distribution, which is 100% open source and nearly identical to Miniconda (and only different from Anaconda in that it does not bundle the Python packages installed by default in the Anaconda base environment, which we recommend you avoid using anyway given any problems in it can break your whole installation).
Then, simply install the packages you need (including Spyder, if you aren’t using our recommended Standalone installers) with conda as you usually do.
Miniforge will automatically use the community-maintained Conda-Forge repository, which has a much wider variety of packages and is generally more up to date than the Anaconda equivalent, in addition to being free of any commercial restrictions.
For more, see our Install Guide.